

Get a Reliable Ring Size From a Printable Chart
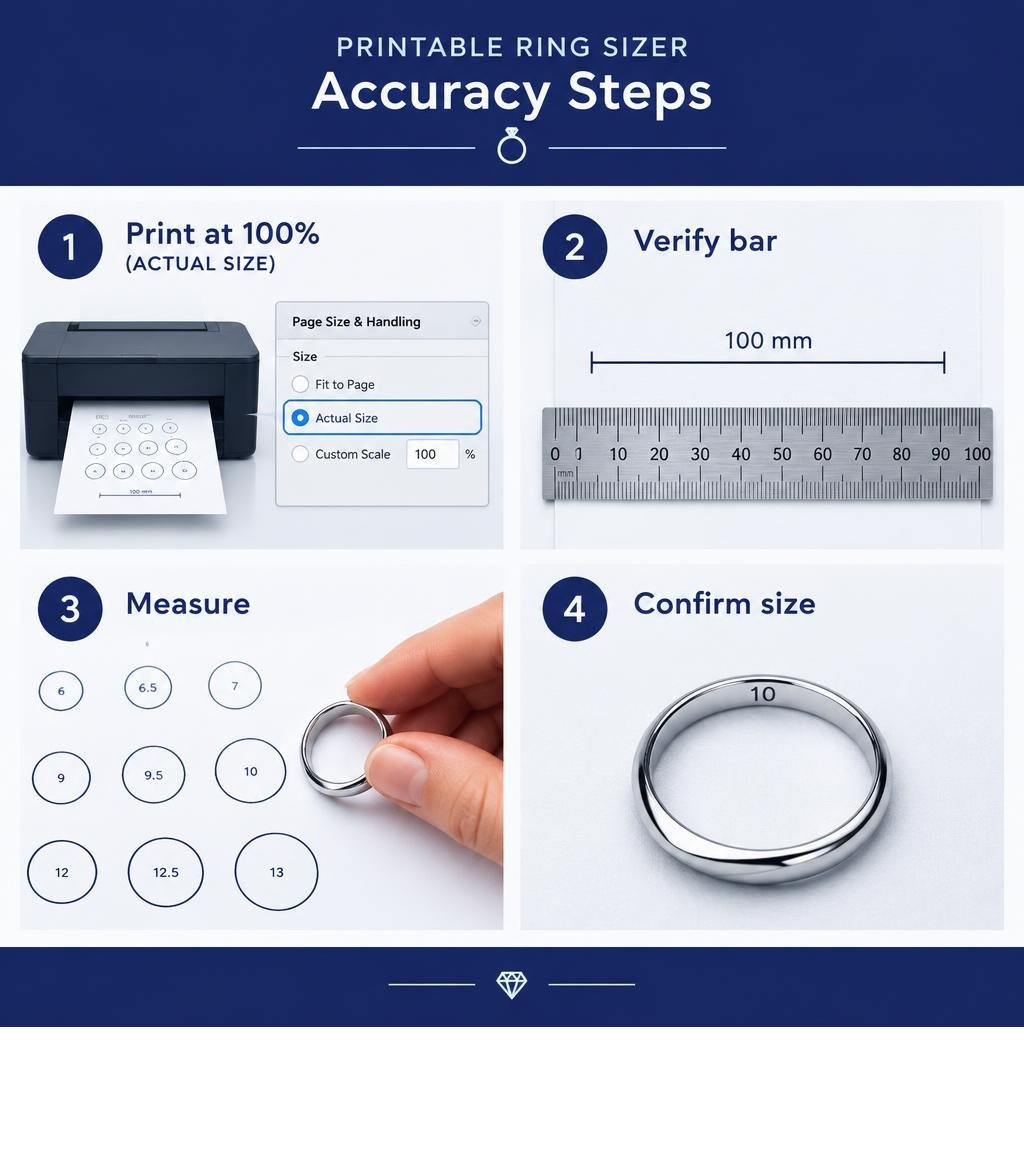
To use a ring sizing printable without errors, print the PDF at 100% or Actual Size, turn off settings such as "Fit to Page," and measure its 100 mm calibration bar with a real ruler. If the bar is not exactly 100 mm, do not measure yet. Adjust the printer settings and print again.
For the best at-home result:
- Match a ring that already fits the intended finger to the chart's inside-diameter circles. This is usually more repeatable than wrapping paper around a finger.
- If no fitting ring is available, cut out the paper strip and pull it snug, not tight. It should touch the skin without pressing in.
- Measure later in the day with comfortably warm hands, then repeat once or twice.
- If you fall between sizes, choose the larger size, especially for a wide band or a larger knuckle.
A printable guide is a smart first check before shopping online, but small errors matter. One US ring size changes the inner diameter by only about 0.81 mm, so printer scaling, paper tension, and normal finger swelling can shift the result.
I'm Ken Rutz of Jeweler's Touch, where our team works with fine jewelry, custom engagement rings, and ring repairs every day. This ring sizing printable guide will help you get a solid home measurement before you make an important purchase or confirm the fit with a jeweler.
Setting Up Your Ring Sizing Printable for 100% Accuracy
Using a home printer for jewelry sizing feels simple enough, but printers love to "help" by adjusting margins and resizing documents automatically. In jewelry sizing, precision is everything. One full US ring size difference is just 0.81 mm in inner diameter. That is roughly the thickness of eight stacked sheets of standard office paper, or about a dozen human hairs. A tiny 3% auto-scaling error from your printer can easily throw your measurement off by an entire size.
To ensure your sheet prints at true scale, you must configure your print dialog carefully before hitting print. You can download a Free Printable Ring Sizer Chart (Print at Home PDF) or access a Printable Ring Sizer (Accurate, Free PDF) + Online Ring Size Tool · The Printable Toolbox to get started with verified vector files.
Disabling Auto-Scaling in Printer Settings
When you open your PDF, look closely at the print preview window. Most systems default to settings like "Fit to Printable Area," "Scale to Fit," or "Shrink Oversized Pages." These settings slightly reduce the image size to preserve wide margins.

To prevent errors, follow these setup rules:
- Select Actual Size or set the Custom Scale box manually to 100%.
- Uncheck Fit to Page, Shrink to Fit, and Borderless Enlargement.
- Ensure the paper format matches your physical sheet, such as standard US Letter (8.5 x 11 inches).
- Avoid printing directly from mobile devices to wireless printers unless the print app explicitly lets you lock the scale to 100%.
Calibrating Your Ring Sizing Printable with a Ruler
Never wrap a printed strip around your finger or lay a ring on a circle chart until you verify the physical paper with a ruler. Quality printable charts include a dedicated calibration bar, typically a 100 mm line, a 5 cm square, or a 2-inch reference line. Resources like this PRINTABLE RING SIZER and this Printable Ring Sizer: Free US, UK & EU PDF incorporate clear calibration boxes for quick physical verification.
Take a rigid physical ruler (preferably with clear millimeter markings) and place it against the printed line:
- A 100 mm calibration bar must measure exactly 10 cm.
- A 1-inch box must measure precisely 1.0 inch.
- If you are using imperial templates like this Printable Ring Sizer - Inch Measurements, the check line must align perfectly with your ruler's inch hashmarks.
If the line is even 1 mm short, your printer scaled the document down. Adjust your printer settings and print again until the ruler confirms perfect alignment.
Two Proven Measurement Methods: Paper Strip vs. Circle Chart
Most printable guides provide two distinct ways to determine your size: a cut-out wrap-around strip and a series of diameter circles. Both serve a purpose, but they carry different levels of precision. If you are secretly planning a proposal, you can learn more about finding your partner's ring size secretly by combining printable templates with rings already in their jewelry box.
Measuring with a Wrap-Around Ring Sizing Printable Strip
The cut-out paper strip measures the outer circumference of your finger. While practical, it is the method most vulnerable to human error. A standard sheet of 20 lb (80 gsm) copy paper is approximately 0.10 mm thick. Paper does not stretch like skin, nor does it glide like polished gold or platinum.

To use the strip accurately:
- Cut the strip cleanly along the solid outer lines. Slit the small printed opening (the slot) carefully with a craft knife or scissors.
- Thread the pointed end through the slit to create a loop.
- Slide the loop over the finger you intend to wear the ring on.
- Pull the strip so it sits snug, not tight. The paper should maintain gentle, continuous contact around the entire finger without pinching the skin or creating a dent.
- Check that you can slide the formed paper loop back off over your knuckle without tearing it.
- Read the number indicated at the slot line.
Pulling too firmly can compress the soft tissue of your finger, making the reading half a size too small. Pulling too loosely leaves empty gaps, causing the reading to be a half size too large.
Matching an Existing Ring to Diameter Circles
When you have a ring that already fits the intended finger comfortably, using the printed diameter circles is significantly more reliable than the paper strip. A metal ring holds its round shape and avoids the tension inconsistencies of paper.
To measure an existing ring:
- Choose a ring with a circular, undistorted band that fits the correct finger on the correct hand.
- Lay the printable sheet flat on a hard table.
- Place the ring directly over the printed circles.
- Look straight down over the top of the ring (not at an angle).
- Find the circle where the printed black line touches the inside edge of your ring all the way around.
The chart circle represents the inside diameter, not the outside diameter. You should see the entire black outline snug against the inner wall of the ring without any white paper showing between the circle and the metal. For those curious about larger dimensions, our breakdown of how large a size 10 ring is illustrates how these millimeter diameter increments translate into real-world measurements.
Crucial Factors That Alter Ring Fit and Size
A ring size is not a permanent, static number. Your fingers change shape constantly throughout the day due to temperature, hydration, and blood flow. Understanding these physical variables prevents costly sizing mistakes.
Temperature and Time-of-Day Fluctuations
Human fingers shrink in cool environments and swell in warmer conditions. In fact, normal daily fluid shifts can change your finger size by a quarter of a US size between morning and evening.
- Best measurement window: Take measurements during the late afternoon or early evening at comfortable room temperature. This is when your hands are at their natural, resting average size.
- When to avoid measuring: Never measure immediately after vigorous exercise, after consuming salty meals, right after waking up, or when your hands feel cold to the touch.
- Consistency rule: Measure your finger three separate times across two days. If all three measurements match, you have found your true baseline.
If you are buying for a man, reviewing our guide on average male ring finger dimensions can give you a helpful baseline for typical sizing expectations.
Knuckle Clearance and Wide Band Widths
A ring must slide over the knuckle with slight resistance and sit securely at the base of the finger without spinning wildly.
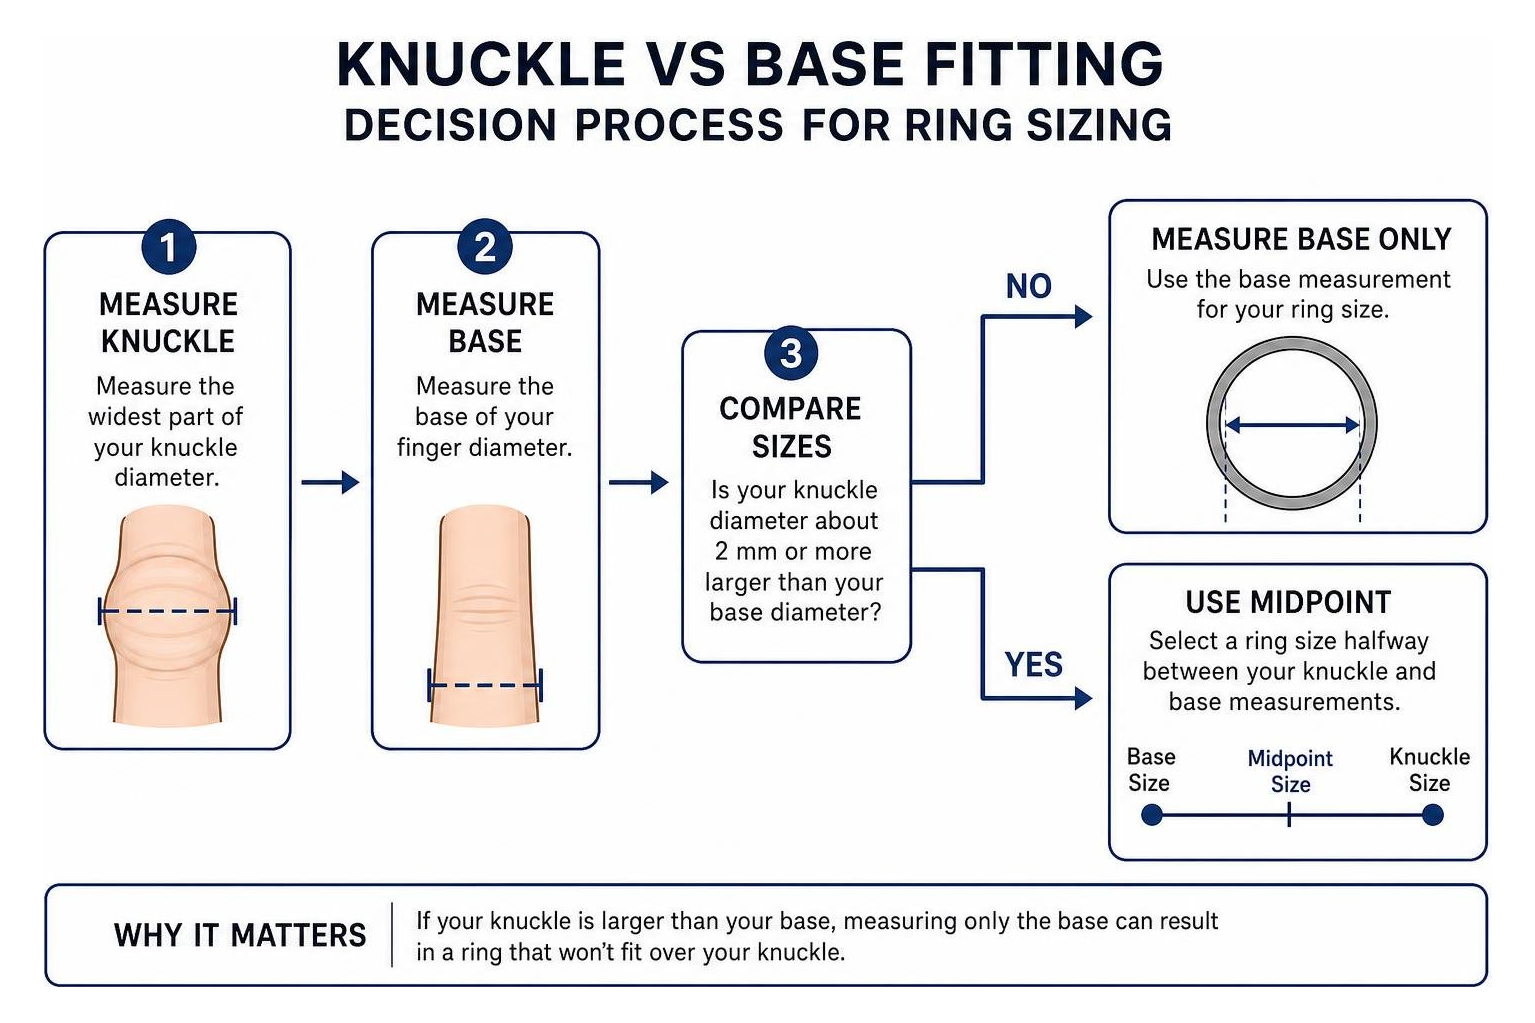
If your knuckle is noticeably larger than the base of your finger (a difference of roughly 2 mm or more in diameter), measuring only the base will give you a ring that cannot physically pass over your joint. In this scenario, measure both your knuckle and the base of your finger, then select a size halfway between the two numbers.
Band width also alters how tight a ring feels on the hand:
- Standard bands (1.5 mm to 4 mm): True to standard chart size.
- Medium-wide bands (5 mm to 6 mm): Order approximately 1/4 size larger than your measured size.
- Wide bands (7 mm to 9 mm+): Order approximately 1/2 size larger than your measured size.
Wider metal bands cover more surface area and displace more skin, creating natural resistance. If a ring does not fit perfectly upon arrival, understanding how ring resizing works can help you decide whether a quick goldsmith adjustment is appropriate for your setting.
International Ring Size Conversion and Sizing Between Numbers
Different countries use different measurement systems for jewelry. The United States and Canada use numeric scales with half and quarter increments, the UK and Australia use alphabetical letters, and European sizing (under ISO 8653) simply uses the inner circumference of the ring in millimeters.
The table below outlines international conversions alongside the exact inner diameter and circumference values:
| US / Canada Size | UK / Australia | EU / ISO 8653 (Circumference in mm) | Inside Diameter (mm) | Inside Diameter (Inches) |
|---|---|---|---|---|
| 3.0 | F | 44.0 mm | 14.1 mm | 0.555 in |
| 4.0 | H | 46.8 mm | 14.9 mm | 0.587 in |
| 5.0 | J 1/2 | 49.3 mm | 15.7 mm | 0.618 in |
| 6.0 | L 1/2 | 51.9 mm | 16.5 mm | 0.650 in |
| 6.5 | M 1/2 | 53.1 mm | 16.9 mm | 0.666 in |
| 7.0 | N 1/2 | 54.4 mm | 17.3 mm | 0.682 in |
| 7.5 | P | 55.7 mm | 17.7 mm | 0.698 in |
| 8.0 | Q | 57.0 mm | 18.1 mm | 0.714 in |
| 8.5 | Q 1/2 | 58.3 mm | 18.5 mm | 0.730 in |
| 9.0 | R 1/2 | 59.5 mm | 19.0 mm | 0.748 in |
| 10.0 | T 1/2 | 62.1 mm | 19.8 mm | 0.778 in |
| 11.0 | V 1/2 | 64.6 mm | 20.6 mm | 0.810 in |
| 12.0 | X 1/2 | 67.2 mm | 21.4 mm | 0.843 in |
| 13.0 | Z 1/2 | 69.7 mm | 22.2 mm | 0.874 in |
When consulting sizing charts across different brands, you may notice minor rounding variations. For a broader look at male proportions, see our standard men's ring sizes breakdown. If your measurement sits exactly between two sizes, the safest rule of thumb is to round up to the nearest half size. A slightly loose ring can easily be fitted with a temporary sizing guard or sized down by a goldsmith, but a ring that is too small cannot be worn at all.
For additional online templates, you can review tools like Printable Ring Sizer: Check the Scale Before Measuring.
Frequently Asked Questions About Printable Ring Sizers
What should I do if I don't have a printer?
If you do not have access to a printer, do not use flexible sewing thread or string to measure your finger. String stretches, twists, and sinks deep into skin tissue, routinely producing errors of two full sizes.
Instead, use a smooth, non-stretching strip of paper cut from an envelope or notebook. Wrap it snugly around the base of your finger, mark the overlapping edge with an ultra-fine pen, and lay the flat strip against a millimeter ruler to find your exact circumference. You can also measure the inside diameter of a comfortable ring directly across its widest center point using a digital caliper or rigid ruler, then compare that millimeter number to the conversion table above.
Are printable paper ring sizers accurate enough for expensive rings?
A printable ring sizing chart is an excellent screening tool for fashion jewelry, casual online orders, or establishing an approximate baseline. However, for valuable investments like diamond engagement rings, custom-designed wedding bands, or eternity bands featuring diamonds all the way around, relying solely on paper is risky.
Eternity bands and alternative metals like tungsten, titanium, and cobalt cannot be traditionally resized. For high-value purchases, we always recommend verifying your measurement with a solid set of jeweler's metal sizing rings before finalizing the order.
Why do different online ring charts show different measurements?
Different retailers and websites sometimes build charts based on varying international standards or rounded conversions. For example, some charts map UK letter steps based strictly on whole-millimeter circumference jumps, while others use standardized fractional diameter formulas.
Brand-specific manufacturing tolerances also play a role. To avoid confusion, always rely on the raw millimeter measurement (either inner diameter or inner circumference) as your primary reference point rather than just the regional size number.
Conclusion
A printable ring sizing chart is a fast, accessible way to estimate your ring size from home. By printing the file at 100% scale, verifying the calibration marks with a physical ruler, accounting for band thickness, and measuring at the right time of day, you can avoid the most common ordering mistakes.
When you are ready to choose an unforgettable ring, we invite you to browse our stunning engagement ring collection. At Jeweler's Touch, we have served Southern California families since 1992. Our team includes 3 GIA Graduate Gemologists on staff and experienced on-site goldsmiths dedicated to quality craftsmanship. Whether you want to confirm your measurement with precision metal sizing gauges, design a custom engagement ring, or resize a treasured family heirloom, we are here to help you get the perfect fit every time.